

Adding a Colour Wheel#
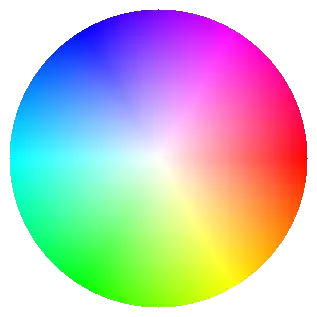
Colour Wheel as found in paint.net#
There are several methods to show the effects of changing selection. Some involve changing a window with the selected hue shown as a gradient with varying saturation and value along the main axes, which does not give an overall colour selection that a colour wheel does. The wheel shows the changes associated with hue and saturation, leaving value to show its own component gradient. By keeping the hue constant and varying saturation one can easily obtain associated colours.
The colour wheel probably is relatively slow to construct and need only be
made once if imported as an image file. For the sake of simplicity leave it
as a png file with a transparent background. Create a PIL image file then
draw a coloured circle with the pixel colours dependant upon the radial
distance and angle (saturation and hue), which in turn are converted to RGB
all the while keeping value at 100.
Show/Hide Code 09colour_wheel_pil.py
""" Construct hsv colour wheel image

Parameters
----------
None

Results
-------
None
"""

from tkinter import Tk
from PIL import Image
from math import atan2, pi
from colourTools import hsv_to_rgb

if __name__ == "__main__":
    root = Tk()
    winsys = root.tk.call("tk", "windowingsystem")
    BASELINE = 1.33398982438864281 if winsys != 'aqua' else 1.000492368291482
    scaling = root.tk.call("tk", "scaling")
    enlargement = e = int(scaling / BASELINE + 0.5)

    im = Image.new("RGBA", (317*e, 317*e), "#FFFFFF00")
    inner = (299*e, 299*e)
    radius = min(inner) // 2
    centre = im.size[0] // 2, im.size[1] // 2
    pix = im.load()

    for x in range(im.width):
        for y in range(im.height):
            rx = centre[0] - x
            ry = centre[1] - y
            sat = 100 * (rx**2.0 + ry**2.0)**0.5 / radius
            if sat <= 100:
                hue = 360 * ((atan2(ry, rx) / pi) + 1.0) / 2.0
                pix[x, y] = hsv_to_rgb(hue, sat, 100)

    im.save('../../figures/colour_wheel'+str(e)+'.png')
Next add the colour wheel to the basic hsv part, then create a moving cursor, test that these work together, then add the rgba part and ensure that the two parts interreact.